It's great to be able to obtain a precious technical information for a real old equipment. The one I got helps me a lot in the area of wiring diagram to repair my antique. PDF gave me clear enough information to find out thr details. Thanks for giving me the oppotunity to be able to access to almost vanished informations.
Another excellent aquisition. Fine detailed manual. Thanks
Text excerpt from page 185 (click to view)
(6)
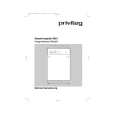
Remove three screws 9 which are holding the guide R (2nd) assy 0 to the bottom plate A. Remove the screw B which is keeping the rear cover C and guide R (2nd) assy 0. Remove the guide R (2nd) assy 0. (7) Remove the protect (M) D, guide bracket E, planet gears F and planet gear bracket G. (8) Remove the E-ring H which is keeping the sheet link I on the guide R (2nd) assy 0, and pull out the hinge stand J. (9) Remove three remaining screws K which are keeping the motor on the motor bracket L, and remove the connector off the Stepping Motor M. (10) Remove two screws N on the Stepping Motor M.
Detail A
0
I
C
J
K K L C B C
Q
O
H P
N
Note : The guide bracket E must be attached as shown in the following illustration:
No jutting of the gear shaft G is allowed into the oval hole E. Turn E clockwise for screw looseness to affix firmly.
M E F G
E
A 9
The upper plate 3 must be attached as shown in the following illustration.